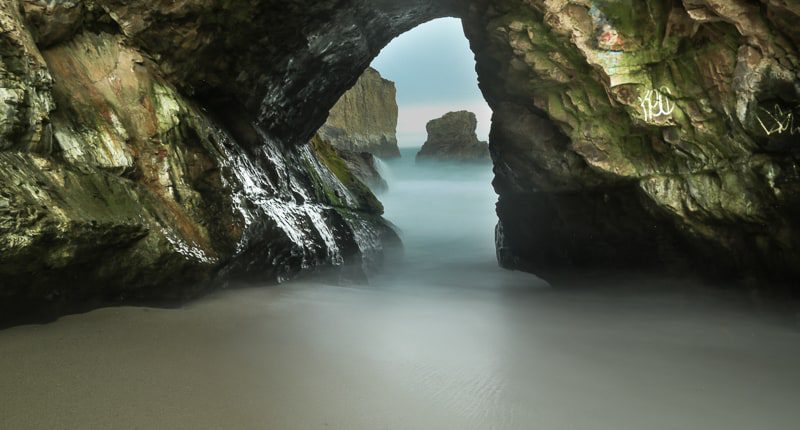
Davenport, California, lies along the Pacific Ocean’s coast, situated about 9 miles north of Santa Cruz, on Highway One. Originally on the San Vicente Creek banks, the town expanded to the north during the twentieth century. Shark Fin Cove is a hidden location near our favorite hotel/restaurant in the area— The Davenport Roadhouse Restaurant & Inn. 

The town is presently noted for the spectacular cliffs and bluffs above the Pacific, beaches in between cliffs, surfing opportunities, the cement plant run by Cemex (shuttered in January 2010), and the former headquarters Odwalla, a company that makes fruit juices.

To get here, leave the Davenport Roadhouse Restaurant and Inn (grab some organic coffee here), leave the location, and make a left while facing the ocean. Go down until you see a parking lot on the right-hand side. There is no sign, but this is where you park to hike down to Shark Fin Cove. It is not an easy hike, so be aware of that before you go. It’s under minutes, but it is very steep.

think tank camera bags

We don’t go anywhere without our Think Tank Camera Bags. Special offer!

Photography Information

It is a steep climb to get to the bottom. Wear good hiking boots and be prepared. It is not easy to get to the bottom.

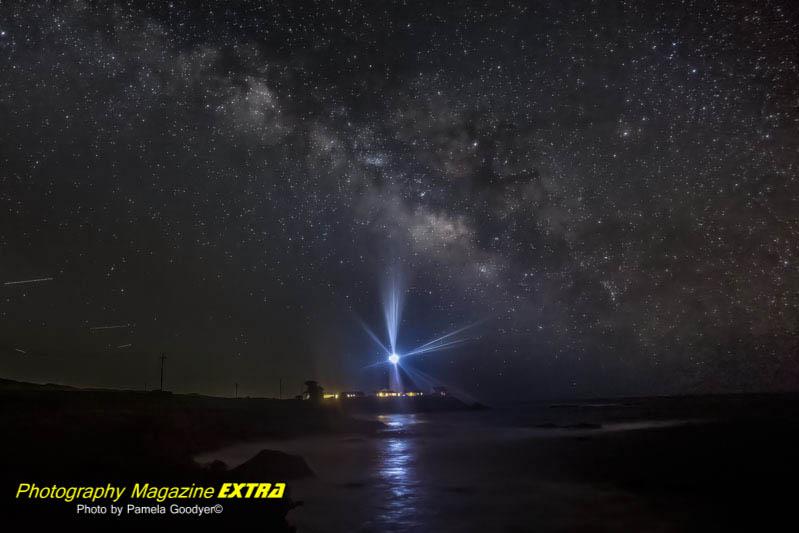
Lens: Generally, this area is a wide-angle lens location and a milky way location.

Gear List at a Glance: Circular polarizing filter, neutral density filters, tripod, shutter release, wide-angle, and zoom lens. CPL filters will help you to create dynamic images. We recommend never shooting outdoors without one. They will make your white puffy clouds whiter, take the silver glare off the waters, and replace it with a beautiful reflection. You have moving waters at the location, so you will want to have your neutral density filters with you to get the long exposure, milky water effect. It is an excellent spot for a ten-stop ND filter. See our ND filter page for more details if you need additional information.

When to Go: Any time of year, but the best time is during the new moon; you can also do milky way photography.

Camera Settings:

Manual Mode – You must use a tripod to do your long exposure running and milky water shots at shark fin Cove. Your settings will vary depending on the lighting and your neutral density filter. You will shoot in manual mode for the milky waters. ISO is always 100 or the lowest your camera will allow. The aperture is always f22. (It lets the least amount of light in). Your shutter speed will vary depending on the light. After putting your neutral density filter on, take some test shots to decide your shutter speed. Roll the meter to the middle where the zero is. (A filter is like sunglasses for your camera to stop light from coming in). Use your live view mode to focus. Use your shutter release or your 2-second timer also to avoid camera movement. Voila. You now have your milky water exposure. You want at least a 2-second exposure to running water. If you don’t have a neutral density filter, you may not get more than 1/15th of a second in the sun. Go to our store to buy your ND filter. Get a 3.0 for super-long exposure in the sunshine, an ND 1.2, and an ND8 for shorter exposures. If you can only afford to buy one, go with the 1.2.

Subscribe

* indicates required

How to Shoot Milky Way and Night Sky Photography

Shark Fin Cove

What you will need:

Light pollution map – light pollution map

Camera – You will need a camera to control your ISO, shutter speed, and aperture manually.

Lens – A fast wide-angle lens of 1.4 – 2.8 is ideal. If you use a 3.5 or higher (slower lens), you will have to increase the ISO. The higher the ISO, the more grain or digital noise or grain in your photos.

Tripod – A good sturdy tripod is essential for night photography. If it gets windy, you will need a sturdy one. Keep that in mind; when you buy one, it should be sturdy enough to withstand the wind but small enough to fit in your suitcase.

Sky Map – Sky Guide is available through the iTunes Store for $1.99. It has a 5 out of 5-star rating on both the current (3.2) version (1200+ ratings) and all previous versions (8600+ ratings).

Flashlight –  Our choice is Coast brand for flashlights. The ideal flashlight will have high lumens, and you will be able to zoom in and out on the amount of light emitting from the flashlight. Get the HP7, PX45, or the G50. Ideally, go with the  HP7.

Moon Phaze Map – The best time to go is during a new moon, and you want to be in the darkest area possible. The week before the new moon, when the moon has not risen, is a perfect time to go, so check the moonrise chart to see when the moon will be up.

Remote Shutter Release – When painting with light and you want to go over a 30-second exposure, you must have a shutter release to use your bulb mode. When exposing your pictures in general, you can use the remote release or your camera’s built-in two-second timer.

Use a Tripod – First, you must be on a tripod. A good sturdy tripod is necessary if it is windy. If the tripod moves, your picture will blur.

Focus – Use live view. Use your camera’s live view to focus in the dark, hit the zoom button, and focus on a bright star. You can also use the infinity setting on your lens but do several test shots to determine accuracy. It can be off a little on some lenses. You can also light it up with a flashlight, focus, then gently, without touching the focus ring, put the camera in manual focus so it will not search for the focus. Each time you move your camera to take your next angel, you would have to do this.

Camera Settings for Night Photography

ISO – Start with ISO 1600 – 3200. This is just a common starting point, and you will adjust from here.

Shutter Speed – Remember, the earth is rotating. If you leave the shutter open for too long, you will see star trails that will not make for a crisp image. We want crisp non-star trail images. Here is the formula to avoid star trails—the 500 rule – Divide 500 by the focal length of your lens. So, if you have a 24mm lens on a full-frame camera, you will set your shutter speed to 20 sec. (500/24 = 20.83). If you are using a crop sensor camera, first do the math of the crop sensor to find the focal length. Cannon is 1.6, and Nikon is 1.5. Convert to full-frame focal length, then use the formula. Nikon 18mm x 1.5= 27mm – 500/27 = 18.51 seconds.

Aperture – Depth of field isn’t critical in these shots, but letting the light into the camera is; therefore, you should shoot wide open. If the depth of field is essential to you, try not to go too high. (wide open =the lowest aperture your camera will allow). You will have to increase the ISO some, which will give you digital noise.

White balance suggestion: Use live view mode to change your white balance settings and see what it will look like. You can shoot in shade or cloud mode as a standard setting and adjust things later.

When to Go: Weekdays are best when it is slightly offseason. This is a tourist town, so be prepared for people. Keep in mind this is also a milky way dark sky area, so you might want to plan your trip around a new moon or the week before during milky way week.

Camera Settings

Aperture Priority

It is generally used to control the depth of field (control how much is in focus from your subject back). If your shutter speed drops to 1/30th sec. or lower because you lack light, you will need to put your camera on a tripod to avoid blurry pictures. Anything handheld below 1/30 sec will be blurry. The higher the “f” number, the less light that will come in, and your shutter speed will drop to let more light in.

When your “f” number goes up, your aperture closes. At f-22, you are barely letting any light in.  Always watch your shutter speed when taking your shot, look at the bottom of the screen through the viewfinder and check your shutter speed. Do not let your shutter speed go too low when hand-holding.  Sometimes you cannot get a super high f stop because you do not have enough light. This will happen quite often at times, such as a sunset. Again, put your camera on a tripod, and now your photos will not blur except for any subject moving in the image.

You might want the opposite effect. That is when your subject is in complete focus, and the background is blurred, called the bokeh effect. You will use your lowest F-number, such as 2.8 or 3.5. Go as small as your particular lens will allow.  Shooting in Aperture Priority allows you to control this.

Shutter Priority

If you have moving subjects such as people moving, you will want to shoot in shutter priority to be sure your images come out sharp. When people are moving slowly, shoot at 1/250th sec, and adjust your ISO accordingly. If they are moving very fast, increase your shutter speed to about 1/1000th sec. If it’s a bright sunny day, go as high as 1/1200 second for very fast-moving subjects.

Manual Mode

You can do your long exposure running, milky water shots if you have moving waters here.  You will have to use a tripod for this effect.  Your settings will vary depending on the lighting and what neutral density filter you have. You will shoot in manual mode for the milky waters.

ISO is always 100 or as low as your camera will allow. Aperture is f22. Your shutter speed will vary depending on the light. Take some test shots to decide on your shutter speed after putting your neutral density filter on. (It’s like sunglasses for your camera to stop light from coming in).

Use your shutter release or your 2-second timer also to prevent camera movement. Voila. You now have your milky water exposure. You will want at least a 5-second exposure to water. (If you don’t have a neutral density filter, you may not get more than 1/15th of a second in the sun. That does not give you a good effect). Go to our store to buy your ND filter. We like a 3.0 for super long exposure in the daytime, and we have a ten-stop filter for bright sunny days.

SMALL USE THIS

Announcing our Photography Contest

All of the winners will have their photo featured in our Magazine  Lots of Prizes

 See all of the Details on our Photography Contest Page.

SMALL USE THIS
area information - photography

AREA

INFORMATION

Shark Fin Cove, Park and Area Information:

Entrance Fees: There are no entrance fees.

GOOD CAMPING

CAMPING

Where to Camp

Add your campground here!

Do you want us to send our photography and ghost-hunting friends to your campground to stay during their ghost-hunting trip? Put your campground information here. We will put a picture of your establishment, the website link, the phone number, and the information on your campground to make it easy for our photographers and ghost hunters to find you. They are good at getting there in the dark.

Would you like to be featured in an article as a place to stay while doing photography or ghost hunting? If so, please send us an email. You will be surprised at how affordable our prices can be.


FOOD & DINING

FOOD & DINING

Davenport Roadhouse Restaurant and Inn – See above in hotel info

We absolutely LOVE this place. It has many healthy meal options and the menu has icons for Vegetarian and Vegan meals and it offers Organic foods too!! We promote healthy living so this is on our top places to eat list.

 RESTAURANT INFOMATION

Add your Restaurant here!

Do you want us to send our photography and ghost-hunting friends to your restaurant after their ghost-hunting trip? Put your restaurant information here. We will put a picture of your establishment, the website link, the phone number, and the information on your restaurant to make it easy for our photographers and ghost hunters to find you.


The best hotels while doing photography

HOTEL

INFORMATION

We foud it to be the best place with the best rates and great service!

Davenport Roadhouse Restaurant and Inn

Convenient Location:  Located just 10 minutes from Santa Cruz, among organic farms, boutique vineyards, and state beaches and hiking trails, is the Davenport Roadhouse Restaurant & Inn.  Our Restaurant features produce from neighboring organic farms, a full bar, and outstanding wines.  Our Inn features ocean views, beds made to our specifications, locally made soaps and lotions, and cashmere-like robes made of soy and bamboo fibers. In a hurry? Visit our Café/Take Out bar serving locally roasted coffees, custom teas, and delicious sweet or savory baked goods made daily.

Add your hotel here!

Do you want us to send our photography and ghost hunting friends to your hotel for their photography or ghost hunting trip? Put your hotel information here. We will put pictures of your hotel, the website link, the phone number and your information on your hotel.

Would you like to be a featured hotel like this article or this one?  Please send us an email.  You will be surprised at how affordable our prices can be.

WEATHER

 WEATHER?

Click here to see what the weather is near the location.

Don’t forget that you can use a rain sleeve on your camera if it is raining. If it is bright and sunny, you want to use a low ISO, such as 100.

If you are doing photography along with your ghost hunting on cloudy days, you can do running water or waterfall photography to avoid the glaring sun. You can also use an ND filter to get a long exposure for dramatic effects, even in the sunshine. If you ghost hunt indoors in abandoned places, be careful!