Aperture – Photography for the Beginner
APERTURE PRIORITY
Aperture – the f-number (sometimes called f-stop) is often used in photography to obtain the depth of field (DOF). Depth of field is the amount of the image in focus from the subject to the background.
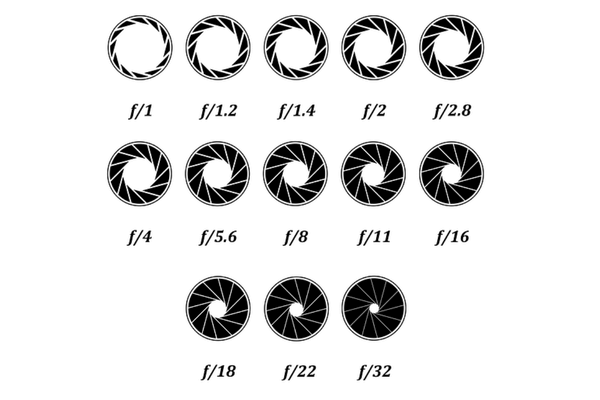
Aperture Priority Mode is a semi-automatic mode on your camera. It is A mode or AV mode (aperture value mode). Typical ranges of apertures used in photography are about f/2.8–f/22.
Aperture is fundamental to understanding to take pictures without using auto mode. Aperture is one of the three basics you must master. The aperture in photography refers to the size of the lens opening when the picture is taken. The only thing you need to worry about right now is this general rule.
Aperture – F2.8 a is considered wide open and lets a lot of light into the camera and blurs the background. (shallow depth of field)
Aperture – F22 lets much less light into the camera and keeps everything focused. All the numbers in between will step you up towards the other end. F8 or F11 is the mid rage.
The aperture is used in conjunction with the shutter speed and ISO setting to expose the image properly. It sounds complicated, but teaching them one at a time and later learning to combine them gets easier.
When you are in aperture priority mode, you set your aperture because your priority is the aperture, and the camera miraculously picks the shutter speed to expose the image properly. Some don’t use aperture priority much, but you must understand what aperture is completely to grasp the basic foundation of photography.
The aperture controls the depth of field in an image. (DOF) The depth of field refers to the amount of the image to the background area in focus. A wide aperture, such as 2.8, will give the subject a sharp focus while everything behind the subject will be blurred. Keep in mind a wide aperture is f2.8, and a small aperture is f22. To remember this terminology, think the opposite of what makes sense. Wide open is a lower number. It seems backward. Remember that, and you will get it down.
GENERAL RULE TO MEMORIZE – f 2.8 means 2.8 feet will be in focus. F22 – 22 feet will be in focus. This is not entirely accurate. It’s just a trick to remember which way blurs and which way focuses. f2.8 blurs and f22 focuses.
If you use a high number (f22), most of the frame will be in focus, including the foreground and background. If you are taking a photograph of a class picture, you will use an aperture of at least f8 so that people in all of the rows will be in focus. This is an example of having a more significant depth of field. If you used f2.8, one row of students would be in focus, and the rest would be blurred. In these situations, having your f stop number higher is better to get more depth of field, ensuring everything is focused.
When we teach this, and we practice for about an hour, and we explain the details in practice, it comes quickly. Reading without lessons makes it a little harder to understand, so be sure to do your homework so you take the knowledge and put it into action and understand it better. You want to commit it to your muscle memory, so repetition for essential. We practice it for about an hour when I teach, so it stays with you.
Depth of field is a fundamental concept you should consider when taking pictures. It is equally crucial for a photographer to understand how to use the aperture setting on a camera to achieve the desired depth of field. These are both fundamental concepts to master when learning digital photography.
In aperture Priority, after setting the aperture to the desired f-stop, the camera will pick the shutter speed to ensure correct exposure. When we lack lighting, we cannot always shoot at a higher f-number since the higher the number, the less light comes in.
Aperture Priority
The photo was taken with aperture f2.8 to create a completely blurred background. Remember when you think wide open means f22 or a high number (which common sense leads you to think) It is backward. A wide open aperture means your lowest f-number.
When shooting in Aperture Priority, our priority is controlling the depth of field. The camera will then pick the shutter speed to ensure the exposure is correct.
Aperture Priority
Homework – Put your camera in A or A/V for aperture priority setting. Use ISO 1600. Do your homework outside with a lot of light. This will make things easier. Set your white balance to match your surroundings, sun, clouds, etc. Take a shot at 2.8, then 3.5, 4.0, 5.6 up to f22. Download your images into your editing software and look at the metadata to see what you shot at and the difference in the photos since I am not there to explain it to you. If you would like a zoom lesson, if I am not out on a photo tour, I can help you with lessons.
Lightroom is a great editing tool for seeing metadata. We do not believe in anything with monthly subscriptions since we will be doing photography until we die and live to be 102. That would mean at twenty dollars a month = 240 per year x 50 years = $12,000. We use what is available for download. We like Photo Impact Pro and use it for almost everything. You can try to find a used lightroom classic CD and download it on your computer and avoid the lifetime monthly fees.
Now, look at our Shutter Speed, White Balance, and ISO pages. These are the four essential components of photography.
If you live in New Jersey, you can take a class from Extra Eyes Photo Tours or have individual instruction in the Central N.J. area. See info here – Extra Eyes Photo Tours.
Photo Credit Above Panoramic Daisy Picture – “Blumen im Sommer” by Maximilian Schönherr – Own work. Licensed under CC BY-SA 3.0 via Commons – https://commons.wikimedia.org/wiki/File:Blumen_im_Sommer.jpg#/media/File:Blumen_im_Sommer.jpg