Shutter Speed for Beginners
Shutter Speed How-To
First, put your camera in Shutter Priority.
- Shutter speed should never be lower than 1/50th of a second without a tripod.
- 1/60th of a second is for subjects that are completely still.
- 125th of a second is suitable for subjects with a bit of movement.
- 1/250 of a second is suitable for someone who is walking by.
- 1/500th is suitable for a car at 25 m.p.h. or so.
- 1/1000th is suitable for super-fast-moving subjects like eagles.
3 second exposure gives the sense of movement.
Shutter Speed Affects the Lighting
Remember that the faster the shutter speed, the less light will come into the camera! Your pictures become more apparent when you increase your shutter speed when the subject moves, but it also lets less light into the camera.
When you start practicing, go outside, where there is plenty of light. It will be much more challenging and complicated when you lose your light. It’s pretty simple in the daylight, so start there.
Shutter Speed Homework
Once you read up on ISO, you can do your homework. Your homework is to go outside in the daylight with good sun. Put your ISO on 800 to let light in a medium amount. Find a fast-moving subject like a car. Take a shot of the moving vehicle, making sure the focus is on the car as it goes by (most cameras have an indicator of what they are focusing on). Put your camera in 1/30th sec. Take a shot of the car. Is it clear? Now move to 1/100th of a second. Take the same picture of a fast-moving vehicle. Is it clear yet? Do the same shot with each shutter speed increment up to 1/2000th sec. What happens as you increase your shutter speed? Are your images getting clearer? Are they getting darker? Good. Because they are supposed to be. Focus on the subject, or the lesson will be lost. Use a big subject like a car, not a bird. Birds are more challenging to focus on.
Review Your Images and Metadata
Download your pictures to your computer and look at the metadata. If you don’t have a program, we suggest you click on one of our Corel ads and look at getting their software. Below is a good beginner program in the ad. We love it. The bottom right side of the screen will show each image’s shutter speed, aperture, and ISO so you can review pictures and see what works. This is how you continue to teach yourself.
Lightroom is our favorite place to edit photos. You can also see the metadata on the image to help you determine how you shot it and what you did right or wrong.
Do your homework after you read the rest of the beginner section, including ISO, Aperture, and White Balance. Keep reading below for a little more advanced information. If you are getting confused, then stop here and practice. Then grasp ISO, Aperture, and WB before proceeding to the more advanced knowledge.
The Waterfall Photography Simplified and How to Shoot Dark Sky Photography Pages will give you some easy-to-understand details on shutter speed. The links are below.
Go to Waterfall Photography Simplified or How to Shoot Dark Sky Photography for detailed explanations.
Shutter Speed Effects
Shutter speed is one method to control the amount of light recorded by the camera’s digital sensor or film. It is also used to manipulate the visual effects of the final image. A high shutter speed can stop a drop of water mid-air on a splash; a slow shutter speed can blur the water on a waterfall for a silky effect.
The Effects of Shutter Speed
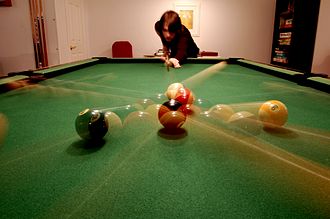
The Effects of Shutter Speed. Fast shutter speeds freeze the movement of fast-moving subjects. Slower shutter speeds capture the movement and give some blur. At 1/15 of a second or longer, cameras cannot capture a clear image and will show motion blur due to camera shake if you are not on a tripod. For beginners, stay above 1/6oth of a second handheld for now.
You must be on a tripod and use a slow shutter speed. This technique blurs everything moving, and what does not move will come out clear. It is used to create the milky water effect of waterfalls.
2-Second Shutter Release
The time lapse between the moment you press the shutter release and the time it fires adds another layer of complexity with slow shutter speeds. Any slight movements can cause blurriness in a photograph. You don’t want this unwanted, unintentional motion. When you are not on a tripod and press the shutter, even though it is a tiny movement, with a slow shutter speed, it can blur the photo. The simple solution is to put your camera in 2-second mode while on a tripod. This is found under the drive shooting menu, where you pick one shot, continuous shooting etc. Otherwise, use a higher shutter speed to avoid blur while hand-holding.
Visit the Aperture Page
Visit the ISO Page


