
Waterfall Photography Simplified
Quickly learn how to shoot waterfall photography


At my own expense, I offer all of this to you: a humble tribute to Mother Gaia. It is my hope that you will spread my art and message to others, uplifting and inspiring their souls.
May my works guide photographers illuminating their path toward creating stunning and impactful images that show the raw beauty and essence of life in all its transcendent glory. —Pamela Goodyer
PLEASE SHARE
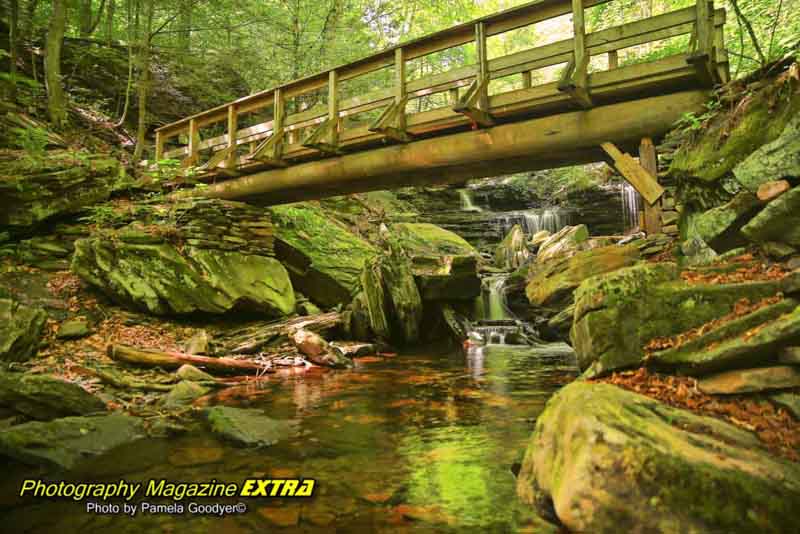
Our job is to locate and share some of planet Earth’s most fantastic photography locations with you and the best place to stay. Ricketts Glenn State Park is a very well-known waterfall photography location. This waterfall is very publicized and on many lists, but we can tell you it is a TOP 10 location on the East Coast of the USA. And when we go to this location, we only stay at The Pine Barn Inn.
We are compiling a master list of all waterfalls and hope you will share your list with us, as many generous photographs have already helped by emailing us their list of falls to us. We thank you for that! We believe we should all share our information with incredible places to have better subject matter, which helps us to be better photographers. That is why we do what we do. Share your waterfall list here.>> Link to Submit Page
Ricketts Glen State Park is a challenging hike with thousands of stairs down and then up. It can be slippery. They have some easy trails, but we don’t think they run along the waterfalls. It’s about a mile and a half downhill, then a mile and a half up the hill on the shortest waterfall route.
We arrived at 7 a.m. We walked out at 4:45 p.m. We have to admit we did skip a section. We had been photographing for hours and were just plain old, running out of steam. Doing every single waterfall as we were doing takes many hours of climbing over rocks, going up and down stairs, and weaseling our way into the best part of the waters for the shots to get the proper perspective.
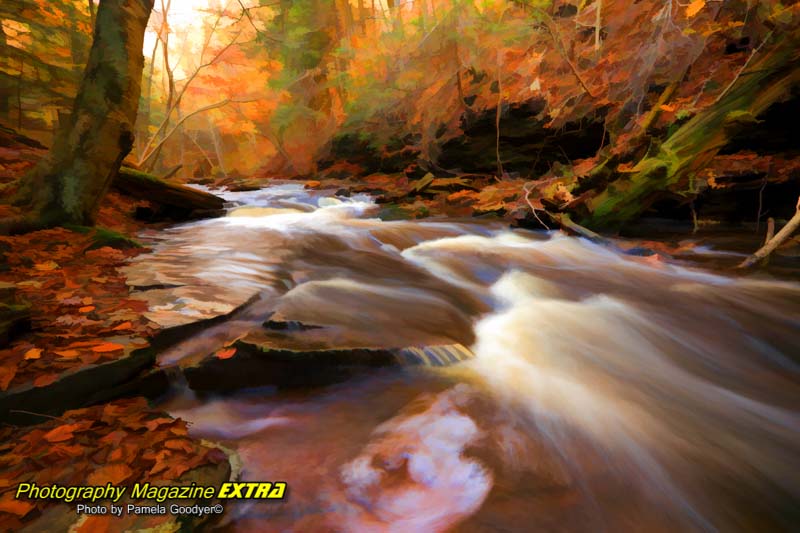
We started at the Rose Lake Parking lot and went down the waterfall trail. We hung a left to go back to the top instead of going down the one path at the bottom and returning up the same trail before going back up. It was about 5 hours into the hike. You can start at either end and do the circle. If you start with the one-mile walk to the falls trail, you don’t have to do it at the end. We like the falls on the Rose Parking lot side best. There were some falls; we just took one picture and kept going. You can tell which falls make good photography if you have the eye, as most of us do.
DO NOT go here without your Neutral Density Filters! We highly suggest buying Promaster Neutral Density Filters. The ten-stop has no color cast at all! We purchased ours at The Photo Center in Brick, New Jersey for about a hundred dollars. This small owned brick and motor photography store is the absolute best place to buy from. Check out lessons and workshops by Extra Eyes Photo Tours. Read about Neutral Density Filters, which one to choose and why you need them. Tell them Pamela Goodyer sent you.

Be sure to stop by the office and get a map or print one to bring with you. We needed it. At one point, we went the wrong way—good thing we had my map. We set off on the wrong trail from the parking lot, then, with a map, we got back on track.
Glens Natural Area Enlargement Map
PA. Government website for park information
ADDRESS:
695 PA-487, Benton, PA 17814, USA
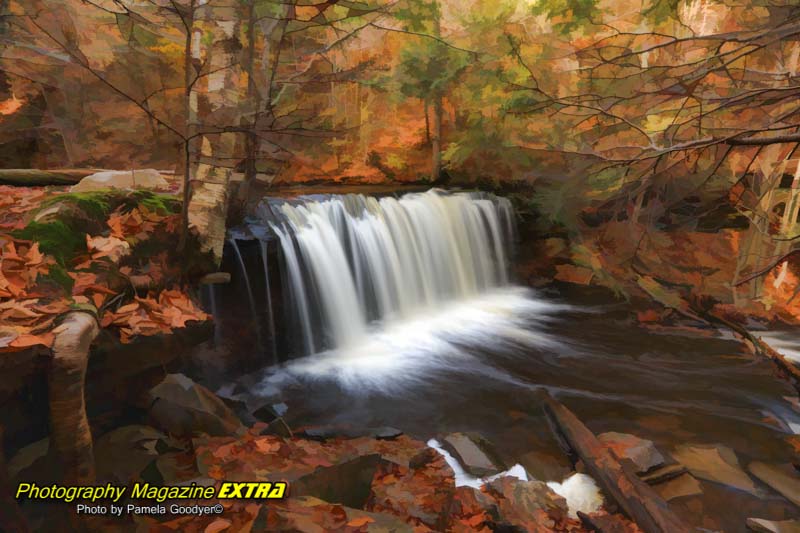
Oneida Falls, one of the park’s smaller but still stunning waterfalls, stands at 13 feet. The cascading water gracefully flows over the ledge and continues downstream. To fully appreciate its beauty, you can admire it from the side or venture downstream for a different perspective.
This is a perfect spot to settle in, camera in hand, and capture the falls from various angles. Don’t hesitate to shift your position and explore different viewpoints. Let your lens click away, taking countless shots of this picturesque location.
We did not name each of the falls as we went along. We focused on the photography. Maybe on our next trip, we will go by the map and label all the falls. A few fall foliage shots are mixed in with our summer photos from another one of our trips here. This will give you a good idea of which season you would like to do, or do what we did!! Do them all.

Be sure to stop along the way. Keep looking. Keep seeing. Look all around for different angles, for different things. I. the art of being a great photographer. Don’t always go where everybody goes. Do something different. See something different, find something different. That’s what Pamela Goodyer does.
You can also take your photography and turn it into art. You can see some examples of it here. Pam also painted some of these images onto canvas.

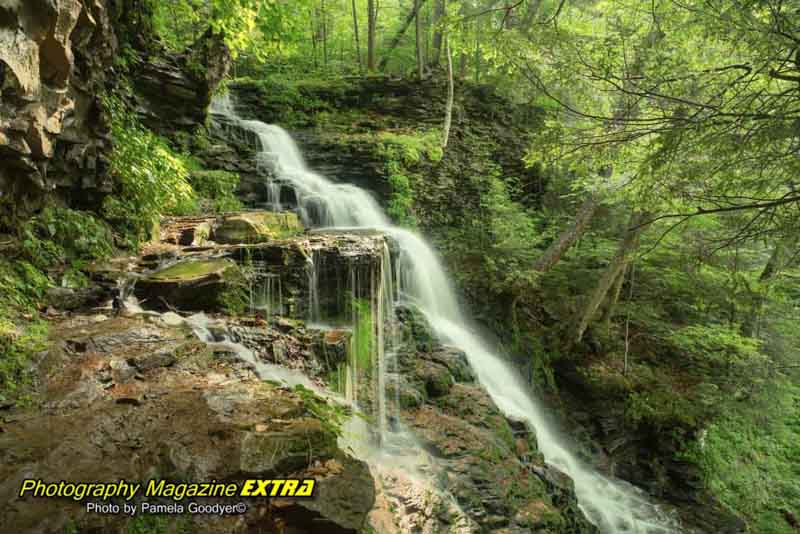
Named after the nearby tribal village, Tuscarora Falls stands tall at 47 feet and is one of the highest waterfalls in Ganoga Glen. It may not be as impressive as Ganoga Falls, which measures 94 feet, but it has charm and beauty. With cascading drops and a split on its final descent, this waterfall is a picturesque spot and my favorite in the park. While the rocks at the bottom provide a great view, they can be tricky to navigate when the water levels are high.
The Waterfall Route is on Falls Trail: 7.2 miles, the most challenging hiking.
Lake Rose Parking Lot is the closest access to Falls Trail. We started here. The entire loop of this trail is 7.2 miles if hiking both the upper and lower sections. The partial trail is a 3.2-mile loop and can be taken by going on the Highland Trail and the Glen Leigh and Ganoga Glen sides of the trail. We took the 3.2-mile circuit and took 9 hours to photograph correctly. We took probably fifteen long exposures of each waterfall, so judge the timing based on how much you photograph. You will do it much quicker if you take one or two shots of each.
To do this waterfall day, you must be in good physical condition. There are several precautions you must take.
The gear for this hike is more than just camera gear. If you chose to do it this way, it would be an all-day event, so be prepared. Bring your widest-angle lens. The most important thing to bring is your set of Neutral Density Filters. If you don’t have them, don’t go. Buy them first. Here is the link to purchase our favorite filters and the ones we used with our pictures above. A good, sturdy, light tripod to carry all day is a must. Bring extra batteries. We recommend you have three camera batteries if you are doing the 3.2-mile loop or the entire loop. You will be shooting in live view mode all day, and nothing drains the battery as fast as live view. Do not run out of memory cards. Shoot this raw to remove blaring white highlights if the sun pops out. Raw takes up way more room to bring extra cards. Bring them in a waterproof carrying case, just in case.
Bring water and food. A light backpack is good to have on. Thank you to my new friend for saving the day. We were out of snacks and starving when we met fellow photographers Brian Kerr and Voila. He offered us power bars, which got us through to 4:45. The story’s moral – Don’t forget your power bars!! A super cool guy who saved the day!
This is the most important thing to remember. Bright sunshine is not our friend when doing waterfall photography, but even the slightest drizzle will make the rocks as slippery as can be here—Timing. We got it right — cloudy skies with occasional sunshine and zero precipitation. We watched the weather and left the night before. We saw perfect conditions. The park is closed for the winter except for those with the proper ice shoes. Be sure to check the exact details with the park on that. Do not do this on a holiday weekend; that is the best time to do it mid-week. There was barely anyone else there at 7 a.m.
You will need to put your camera on a tripod. You will also want to use a remote shutter release to expose the image. You can also use the camera’s 2-second self-timer if you don’t have one. This will only work if you use a tripod, so if you are new to this, please know that a tripod is an absolute must.
You can use the live view mode we suggest for this location. The mirror automatically locks up when using this mode. Shooting from a lower angle does make more dynamic images.
Put your neutral density filter on your camera. Even on a cloudy day, you will want to use a Neutral Density Filter. It’s like sunglasses for your camera. You can do a more prolonged exposure, which is what makes the milky effect of the water movement. The darker the ND Filter, the longer you can expose it. See how to use a neutral density filter and which ones we suggest.
Set your camera to manual mode, then set the aperture to the smallest one (most will be f/22, some will be f/29). Set your ISO to 100, or the lowest it will go on your camera. Looking through the camera, roll the shutter speed so the exposure level indicator goes to ‘0’ on the exposure scale. Without a filter, you may not get lower than 1/15th sec. or even that low on a sunny day. This is why a neutral density filter is so important. We have a 3.0 filter. We can do a 30-second exposure at noon in bright sunshine with that bad boy.
Set your Camera on a 2-second timer or use your shutter release to expose the image. Evaluate the image. If your idea has hot spots (areas of overexposed spots), slow your shutter speed down to a stop and test again until it is just right. Remember, the darker the filter, the longer the exposure.
Check each image as you go so you do not blow out the highlights of the white water. It is better to underexpose your shot than over-expose. You can fix an image that is good dark, you cannot fix blown out highlights.
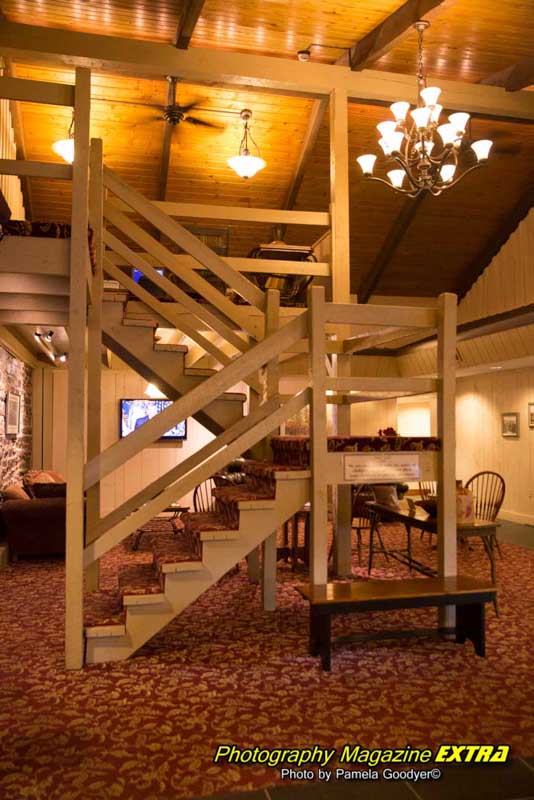
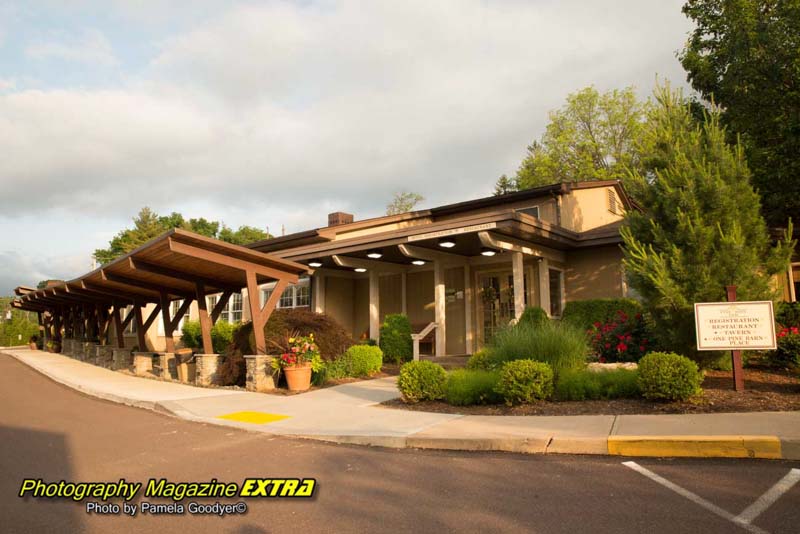
This was our obvious choice of where to stay. There aren’t many places close to the park. Some places are about 15 minutes closer, but this is well worth the extra time to get there. The hotel will provide an outstanding experience from start to finish and food that is out of this world! From booking through checkout, you will experience nothing but exceptional service. The Pine Barn Inn thrives on hospitality in the tradition of early innkeeping. Plan to stay here on your Rickett’s Glen Waterfall Adventure.
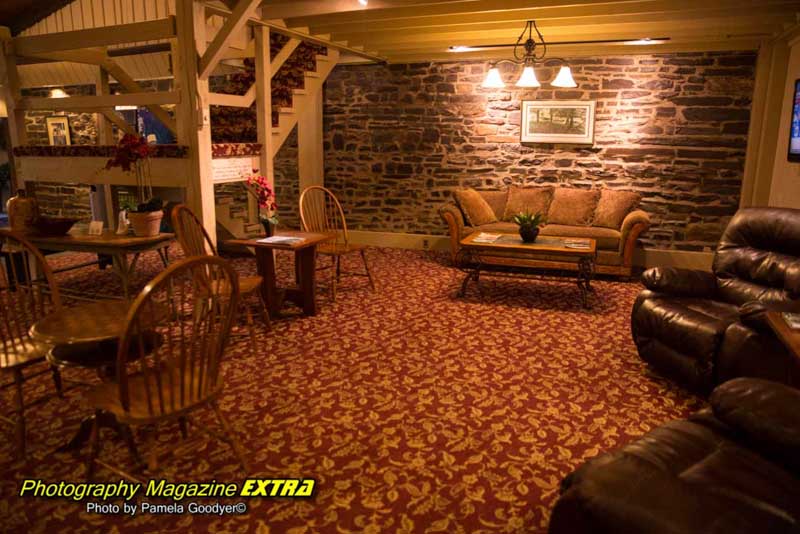
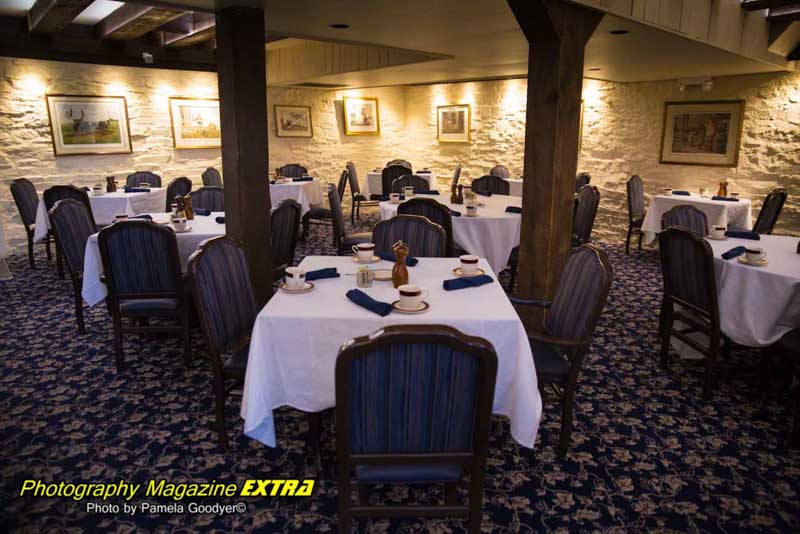
Pleasant lodgings, a rustic tavern, and various cheerful dining rooms combine with a standard for delicious food and excellent service. The Pine Barn Inn is the premier full-service hotel in the Danville, PA, area. The exposed stone walls, antique posts, and beams in the Pine Barn Inn’s dining rooms date back to the 19th century when this typical German bank barn was built on one of Danville’s earliest farms. We picked this hotel due to its fantastic atmosphere.
Plan on eating here as part of your Waterfall Adventure.
When you finish your waterfall photography in the park, head back to the hotel restaurant to top off the day in just the right way. The seafood platter is to die for, by the way.
The Pine Barn Inn offers Old-world service — the kind that pampers the patron — and awaits the hungry photographer who ventures into the Pine Barn Inn’s dining rooms. The menu has just the right options, and the prices are excellent.
The Pine Barn Inn offers an elegant full-course dining experience or casual fare in their tavern. The inn staff will exceed your expectations. Our waitress could not stop smiling, and Jon, who served the table next to ours, had everyone laughing. We had excellent service and food at this beautiful restaurant. We chose fine dining. On our way out to our room, we could hear the live band playing on the patio dining area. Dust in the wind was playing as we strolled to our building, full bellies and all — what a great feeling at the end of a great photography day.
Ricketts Glen State Park – Visit the website here.
Red Rock Mountain Campground is Just down the street from the State Park
Here are our new friends we made on the trail, Chris & Melissa McGonigle. We had them hold their breath since they mentioned getting the water to blur in the background, and we did a two-second exposure. The sun was not our friend here, but we didn’t want to make them wait for a cloud. Thanks for letting us take your picture, Chris and Melissa. We hope you had a great hike, too!


You will need a camera to control your ISO, shutter speed, and aperture manually.
A fast, wide-angle lens of 1.4 – 2.8 is ideal. If you use a 3.5 or higher (slower lens), you must increase the ISO. The higher the ISO, the more grain or digital noise or grain will appear in your photos.
A good, sturdy tripod is essential for night photography. If it gets windy, you will need a sturdy one. Remember that when you buy one, it should be sturdy enough to withstand the wind but small enough to fit in your suitcase.
Sky Guide is available through the iTunes Store for $1.99. It has a 5 out of 5-star rating on both the current (3.2) version (1200+ ratings) and all previous versions (8600+ ratings).
Our choice is Coast brand for flashlights. The ideal flashlight will have high lumens, and you can zoom in and out on the light emitting from the flashlight. Get the HP7, PX45, or the G50. Ideally, go with the HP7.
The best time to go is during a new moon; you want to be in the darkest area possible. The week before the new moon, when the moon has not risen, is a perfect time to go, so be sure to check the moonrise chart to see when the moon will be up.
When painting with light and over a 30-second exposure, you must have a shutter release to use your bulb mode. When exposing your pictures, you can use the remote release of your camera’s lock-in two-second timer.
Start with ISO 1600 – 3200. This is a common starting point, and you will adjust from here.
Shutter Speed – Remember, the earth is rotating. If you leave the shutter open for too long, you will see star trails that will not make for a crisp image. We want crisp, non-star trail images. Here is the formula to avoid star trails—the 500 rule – Divide 500 by the focal length of your lens. So, if you have a 24mm lens on a full-frame camera, you will set your shutter speed to 20 sec. (500/24 = 20.83). If you are using a crop sensor camera, first do the math of the crop sensor to find the focal length. Cannon is 1.6, Nikon is 1.5. Convert to full-frame focal length, then use the formula. Nikon 18mm x 1.5= 27mm – 500/27 = 18.51 seconds.
Depth of field isn’t needed on these Milky Way shots, but letting the light into the camera is; therefore, you should shoot wide open if. If the depth of field is essential to you, try not to go too high. (wide open =the lowest aperture your camera will allow). You will have to increase the ISO some, giving you digital noise.
Now that the ISO and aperture are set in manual mode roll your shutter speed until your meter reads (0) zero. Take a test shot and adjust from there. Remember, the earth is rotating. If you leave the shutter open for too long, you will see star trails that will not make for a crisp image. You can make star trails specifically, but that’that’swhat we are going for here since we started with Milky Way photography. We want crisp, non-star trail images when doing this.
Here is the formula to avoid star trails—the 500 rule – Divide 500 by the focal length of your lens. So, if you have a 24mm lens on a full-frame camera, you will set your shutter speed to 20 sec. (500/24 = 20.83). If you are using a crop sensor camera, first do the math of the crop sensor to find the focal length. Cannon is 1.6, Nikon is 1.5. Convert to full-frame focal length, then use the formula. Nikon 18mm x 1.5= 27mm – 500/27 = 18.51 seconds.
In live view mode, you can change your white balance settings and see what it will look like. You can shoot in shade or cloud mode as a standard setting and adjust things later when editing.
To focus in the dark, use your camera’s view, hit the zoom button, and focus on a bright star. You can also use the infinity setting on your lens, but do several test shots to determine accuracy. It can be off a little on some lenses. You can also light it up with a flashlight, focus, then gently, without touching the focus ring, put the camera in manual focus so it will not search for the focus. You must do this each time you move your camera to take your next angel.
The best images are usually of the dense part of the Milky Way. We can see this part of the milk way in the southern sky. During March, April, and May, the Milky Way rises above the horizon in the pre-dawn hours. In June, at about 10:00 p.m., you will see the Milky Way. From July until October, you can see the Milky Way as soon as it sunsets, and it becomes dark enough to see about an hour after sunset. In November, the Milky Way no longer comes above the horizon. You will have to wait until March if you want to stay away really late or get up early to see her again.
See our Milky Way Hot Spot Locator and our Night Photography Information.
 Photography, Lessons, Workshops and Classes.


